Add ZRIB Board

Hi there,


I recently bought a P802QA printer from Zonestar
via Aliexpress. In my opinion a pretty decent printer at a low price for
beginners.

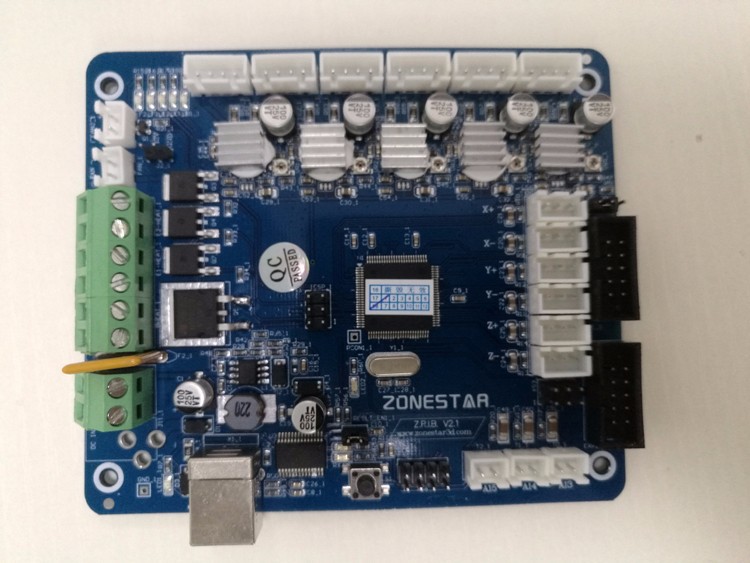
It came equipped with Zonestars own
"ZRIB" Board and a "2004 LCD with 5 Keys".

Since the ZRIB board isn't listed in Repetier and
the LCD is (in my opinion) only remotely supported, i had to do some reverse
engineering to compile a new firmware from the site.

So in this post i like to share what i found out
till now. And maybe you like to integrate these Parts in one of the next
firmwares...


1. Adding ZRIB to pins.h


a: Change motherboard in configuration.h to 39 #define
MOTHERBOARD 39
and #define
ADC_KEYPAD_PIN 10


b: Change the first lines of the Arduino Mega pin
assignment in pins.h to this:

#if MOTHERBOARD ==
33

#define KNOWN_BOARD 1

#define RAMPS_V_1_3

#elif MOTHERBOARD == 34

#define KNOWN_BOARD 1

#define RAMPS_V_1_3

#define AZTEEG_X3

#elif MOTHERBOARD == 35

#define KNOWN_BOARD 1

#define RAMPS_V_1_3

#define AZTEEG_X3_PRO

#elif MOTHERBOARD == 39

#define KNOWN_BOARD 1

#define RAMPS_V_1_3

#define ZRIB_V2

#endif

#if MOTHERBOARD == 3
|| MOTHERBOARD == 33 || MOTHERBOARD == 34 || MOTHERBOARD == 35 || MOTHERBOARD
== 39

#define KNOWN_BOARD 1


C: Add the following lines to pins.h. It has to be
inside the RAMPS board definition, I did it above the #ifdef AZTEEG_X3

// Zonestar ZRIB
V2.1 Board

#ifdef ZRIB_V2

#undef HEATER_2_PIN

#define
HEATER_2_PIN
      
7

#define ORIG_FAN2_PIN    6

#define
SD_DETECT_PIN
    
49

#define
LCD_PINS_RS
    
16

#define
LCD_PINS_ENABLE
  
17

#define
LCD_PINS_D4
    
23

#define
LCD_PINS_D5
    
25

#define
LCD_PINS_D6
    
27

#define
LCD_PINS_D7
    
29

#define
BEEPER_PIN
     
37

#endif


2. Adding Zonestar
LCD to ui.h


a: Add/change the pin definitions for the Zonestar LCD in ui.h

// This must be defined in the Configuration.h
since used in ADC tables

//#define ADC_KEYPAD_PIN         1   
// A1 (D30, analog numbering)


// Display

#define UI_DISPLAY_TYPE          DISPLAY_4BIT

#define UI_DISPLAY_CHARSET       1

#define UI_COLS                  20

#define UI_ROWS                  4


#if MOTHERBOARD == 39 // ZRIB

  #define
BEEPER_TYPE
            1


  #define
UI_DISPLAY_RS_PIN
      16

  #define
UI_DISPLAY_RW_PIN
      -1

  #define
UI_DISPLAY_ENABLE_PIN
  17

  #define
UI_DISPLAY_D4_PIN
      23

  #define
UI_DISPLAY_D5_PIN
      25

  #define
UI_DISPLAY_D6_PIN
      27

  #define
UI_DISPLAY_D7_PIN
      29


  #define
UI_RESET_PIN
           41


#elif MOTHERBOARD == 703 // MEGATRONICS 3


  #define
UI_DISPLAY_RS_PIN
      32

  #define
UI_DISPLAY_RW_PIN
      -1

  #define
UI_DISPLAY_ENABLE_PIN
  31

  #define
UI_DISPLAY_D4_PIN
      14

  #define
UI_DISPLAY_D5_PIN
      30

  #define
UI_DISPLAY_D6_PIN
      39

  #define
UI_DISPLAY_D7_PIN
      15

  #define
BEEPER_TYPE
            1


#elif MOTHERBOARD == 63 // Melzi


  #define
UI_DISPLAY_ENABLE_PIN
    29

  #define
UI_DISPLAY_RS_PIN
        28

  #define
UI_DISPLAY_RW_PIN
        -1

  #define
UI_DISPLAY_D4_PIN
        10

  #define
UI_DISPLAY_D5_PIN
        11

  #define
UI_DISPLAY_D6_PIN
        16

  #define
UI_DISPLAY_D7_PIN
        17


#endif


These
settings work with ZRIB and Megatronics 3 (tested). I cannot test it with a
Melzi Board since I don’t have one.


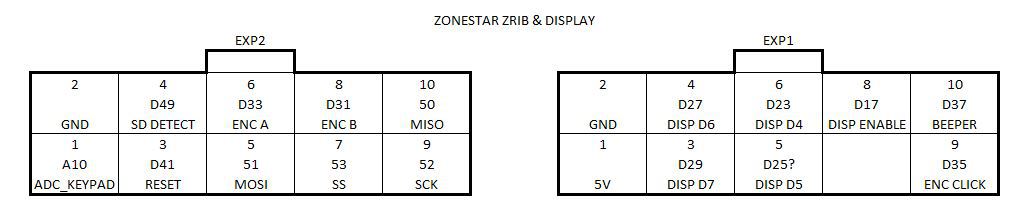
3. Use the Zonestar LCD with the ZRIB Board


a: Define Controller GLCD in configuration.h #define FEATURE_CONTROLLER 11


b: Use two
10Pin flatcable connect EXP1 to EXT1 and EXP2 to EXP2.


4. Use a REPRAPDISCOUND Fullgraphics LCD with
the ZRIB Board


a: Define Controller GLCD in configuration.h #define FEATURE_CONTROLLER 24


b: Use two
10Pin flatcable and flip one side of each cable by 180° so
 
Pin 1 becomes Pin 10, 2 becomes 9 and so on. Then
just connect EXP1 to EXT1 and EXP2 to EXP2.
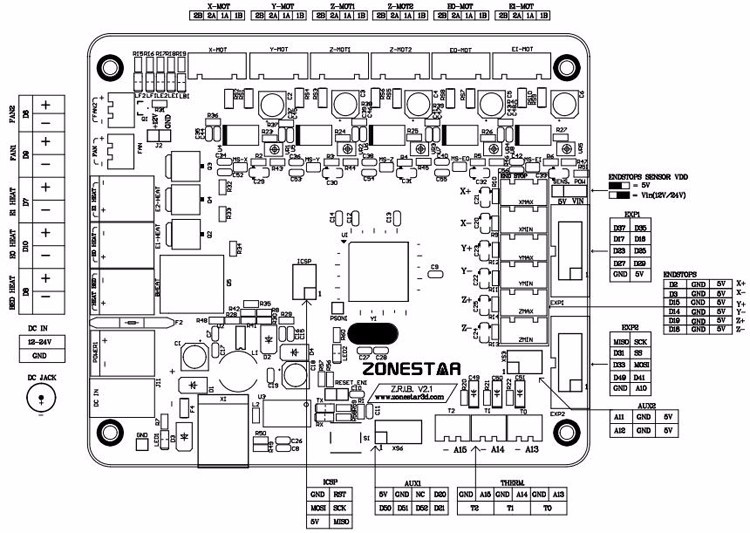
 

5. Pins

I found
pretty low res pic of ZRIBs pins on Aliexpress which I attach to this post. As
for the Display and Keyboard connectors EXP 1 & 2 on the ZRIB and LCD I made
my own scheme for the pins which is also attach. I assume you could connect
different displays than those two I tested.


If you
have any questions or want me to test something, please feel free to ask.


Greeting
Andi


image


imageimage

Comments

  • Hi, I am very new in 3D printer n just bought the P802QR2, have lots of issue with printer. Can you kindly put in step by step instructions how go about on your said update of mother board firmware or a link which can learn n follow, how to find the pins.h etc ?from source code how to get? as I try to upload the firmware with the Adoine IDE and resulted the LCD only got two lows blank block n beeping sounds cannot initiate and go into ready mode as before. Forgive me if I ask to much but this is the only forum and you are the one that contribute on this mother board issue. Thanks.
  • I think you have switched the correct controller ids. 11 is GLCD from reprapdiscount and 24 is zonestar 20x04 display.

    I also saw no extra entry for GLCD so assume pins are same as for RAMPS which is why it works.

    Your additions are now added to development version and can be selected in the online config tool.

    @ksqueh147 use dev version, there you can now select the board, no need to fiddle around it yourself.
  • Hi Repetier,

    You're right, i've switched the controller ids...

    And yes the pins are somewhat the same as for RAMPS. Just keep in mind that, to use the GLCD on ZRIB, two crossed over 10 Pin cables have to be used!

    Thank you for adding my additions. I've just tested them and they work fine :)

    @ksqueh147 as said, use the dev version. its pretty convenient for zonestar users now
  • Hi Repetier and AndreasMader,
    Sorry what mean by use the dev version? My LCD left two lows of blank screen and cannot start up. Not respond to keypad, cannot link up to cura only repetier server can see my printer is connected but not respond to any thing! Arduino IDE can connect but always give time out errors. Please help.
  • What can you see in arduino monitor if you connect there? Sounds like it hangs on startup.

    Every second line full is a not initalized display, but if startup hangs that might be a consequence or the reason (if it is a I2C driven display). 
  • Looks like you have some major issues with your printer.
    Maybe you want to load a firmware made by zonestar and see if that works.
    They've just uploaded a video to explain how that works. You can find the zonestar firmwares in the download link they provide.


  • Hello,

    At first: Thank you Repetier and Andreas for the work you did.

    I Own a zonestar 802n. I changed it to a 2 extruder-1 hotend printer. I used de dev version to make the firmware. 
    When I chose the interface "zonestar 802m....... " The buttons don't work. Because I use Repetier Server Pro that isn't a big issue. But also the server is pausing at ramdom moments. Sometimes after a few seconds, somtimes after a few minuts. I have to manually start the print again.
    When I make a firmware without a display there is no problem at all.
    It seems the printer gives a pause-command to the server when I'm using the zonestar interface.
    Do you have any idea what can cause this problem?

    Greeting

    Henk

  • Display is not supposed to pause just because it is there. And if it does like when jam is detected it should show why. jam detection is the only reason for pauses I can think of except if the not working lcd causes some hang, but normally this is only possible with I2C display, all others do not care about display responses.
  • sounds to me like you configured the wrong ADC channel for the buttons and its pressing them at random.
  • Thank you for the quick response. 
    I don't have jam detection installed. And all settings are the same exept for the display: with no display all works fine, with display, server pauses.

    I can do without because of the server but sometimes it is easyer with display

  • edited April 2017
    Hi everybody,

    I've recently purchased a Zonestar P802QA and it came equiped with a ZRIB V3 controller board. As far as I can tell the only difference between V2 and V3 is the USB to Serial controller, so my guess is that I can treat the V3 the same as a V2 when configuring the firmware, right? The only additions to the standard P802Q that I have is the auto leveling sensor and runout detection.

    I'm a little anxious to flash the firmware from ArduinoIDE. I'de used the dev version of the configurator and selected the V2 Zrib board. But there are so many settings that could potentially screw things up.

    So my question is this; is there anybody with the same printer and is willing to share configuration.h, pins.h and ui.h?

    Regards,

    Arjan
  • Hi Arjan,

    I have a 802N. When i Asked zonestar the sourcecode "For a bit of tweaking", they sent it to me. So you can try that. 

    Beside the chages above i build in a glass printbed with different demensions so I don't think you can use my configuration.h

    Succes

    Henk
  • I've also asked Zonestar for the sourcecode. Haven't heard from them since (been a couple of days, so it could still happen)

    I love the printer, but I'm struggling to get auto bed levelling working.


  • I've received the source code, both from Henk (thanks!) and from Zonestar. Uploading it with no changes works fine, only changed the name of the printer to show that it really is *my* version that's running.

    After that I tried the dev version. Uploaded the configuration.h in the configurator and downloaded the source package. Compiled and uploaded it from ArduinoIDE. This gave me the same problems as ksqueh147; first and third row solid blocks and no response. It took a lot of tries and switching off/on of the printer and my laptop to get it working again with the original source.
  • Was their source from config tool? You see this in the end where you see a commented json string with settings for the tool. If not it will not copy the settings.
  • Yes, Zonestar used the configurator tool, but made manual changes afterwards. So, the configuration is not complete.

    But I'm getting the hang of configuring and flashing the firmware with the dev version. It takes a lot of time to get all settings correct, but I"m pretty much done. I only make changes in the configurator (upload old configuration.h, change settings and download agan) and then compare the settings with the source from Zonestar.

    I'm making progress :)
  • Yes, it is not so clever to modify afterwards without the tool. How should tool know about that :-(
  • edited April 2017
    I agree.

    I've gotten the dev version running reliably in the meantime. A lot of printing problems I had (which I attributed to firmware) were the result of a faulty sd card.

    I've put op a working Configuration.h for the Repetier dev version tailor made for my specific printer on GitHub:


    I'll do my best to keep it up to date with my progress.
  • I order this printer for some days ago ,
    Om the board its writen  V3.2
    I install a soft ware so i can connect to the com4 port.
    But how can i innstall a printer software, and where can i find the driver for win10?
  • www.repetier.com -> Repetier-Firmware. Read the documentation. Driver might be included in Arduino IDE otherwise the vendor should provide the driver.
  • LoermansA said:
    I've received the source code, both from Henk (thanks!) and from Zonestar. Uploading it with no changes works fine, only changed the name of the printer to show that it really is *my* version that's running.

    After that I tried the dev version. Uploaded the configuration.h in the configurator and downloaded the source package. Compiled and uploaded it from ArduinoIDE. This gave me the same problems as ksqueh147; first and third row solid blocks and no response. It took a lot of tries and switching off/on of the printer and my laptop to get it working again with the original source.
    Which board did you select in the Arduino IDE? I don't see a Zonestar in the drop down
  • Zonestar ZRIB 2.1 but it only available in dev version for 1.0!
  • I've been unable to get into contact with Zonestar, anyone have the sourcecode for the P802N lying around they could send me?
Sign In or Register to comment.