Custom Kinematics
Hello there,
Im currently building a printer with custom kinematics. The hardware is almost done, however, Im currently banging my head against a wall, trying to make it move as i should.
The kinematics go as such, the Z and Y axis are simple enough, resembling a Cartesian style of printer, the only twist being that there is only 1 Z motor, and 2 Y motors that work intend um.
It is with the X axis, that stuff gets somewhat interesting, since the Y and X are connected via the carriage and thus need to move to account for each other.
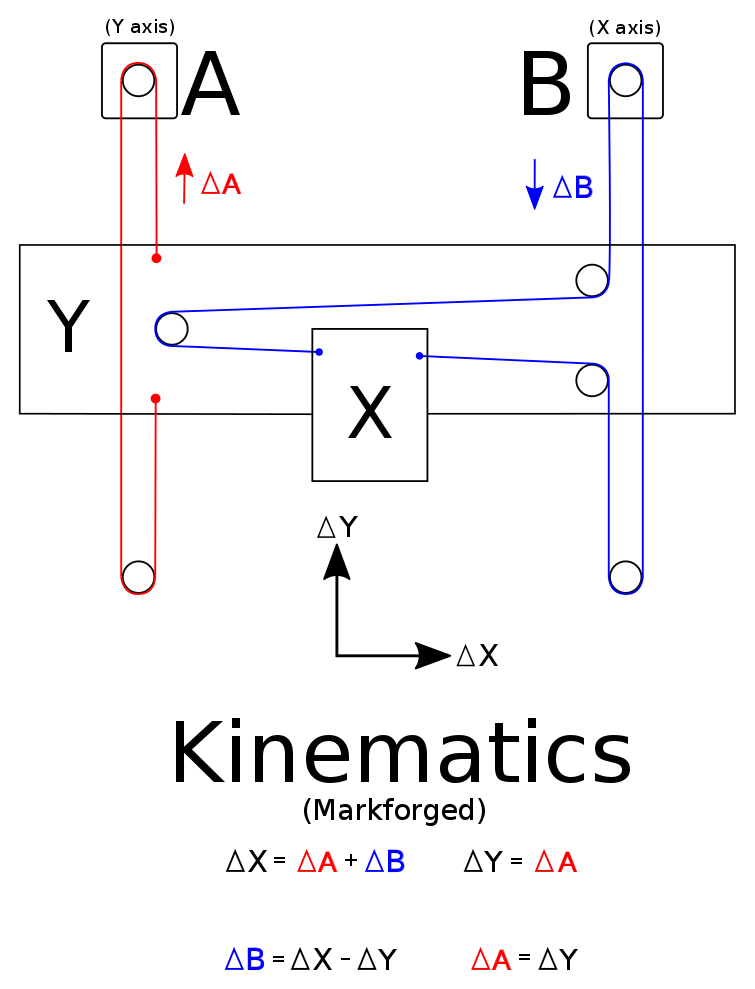
It is somewhat similar to markforges mechanism, except with dual Y motors, heres a screenshot;

I would really appreciate any and all help, I can get in my endeavor, especially given that this will eventually be an open source design, and I am terrible at coding.
pls halp
Im currently building a printer with custom kinematics. The hardware is almost done, however, Im currently banging my head against a wall, trying to make it move as i should.
The kinematics go as such, the Z and Y axis are simple enough, resembling a Cartesian style of printer, the only twist being that there is only 1 Z motor, and 2 Y motors that work intend um.
It is with the X axis, that stuff gets somewhat interesting, since the Y and X are connected via the carriage and thus need to move to account for each other.
It is somewhat similar to markforges mechanism, except with dual Y motors, heres a screenshot;

I would really appreciate any and all help, I can get in my endeavor, especially given that this will eventually be an open source design, and I am terrible at coding.
pls halp
Comments
https://github.com/repetier/Repetier-Firmware/tree/dev2
The corexyz definition allows defining the formula in definition, so it will be able to handle all possible linear combinations. Drawback is that not everything is finished. No lcd and bed leveling is in work.
The not so easy solution is to use fast corexy as control solution. There you can quite easily modify the computation in this function in motion.cpp
#ifdef FAST_COREXYZ
uint8_t transformCartesianStepsToDeltaSteps(int32_t cartesianPosSteps[], int32_t corePosSteps[]) {
#if DRIVE_SYSTEM == XY_GANTRY
//1 = z axis + xy H-gantry (x_motor = x+y, y_motor = x-y)
corePosSteps[A_TOWER] = cartesianPosSteps[X_AXIS] + cartesianPosSteps[Y_AXIS];
corePosSteps[B_TOWER] = cartesianPosSteps[X_AXIS] - cartesianPosSteps[Y_AXIS];
corePosSteps[C_TOWER] = cartesianPosSteps[Z_AXIS];
#elif DRIVE_SYSTEM == YX_GANTRY
// 2 = z axis + xy H-gantry (x_motor = x+y, y_motor = y-x)
corePosSteps[A_TOWER] = cartesianPosSteps[X_AXIS] + cartesianPosSteps[Y_AXIS];
corePosSteps[B_TOWER] = cartesianPosSteps[Y_AXIS] - cartesianPosSteps[X_AXIS];
corePosSteps[C_TOWER] = cartesianPosSteps[Z_AXIS];
#elif DRIVE_SYSTEM == XZ_GANTRY
// 8 = y axis + xz H-gantry (x_motor = x+z, z_motor = x-z)
corePosSteps[A_TOWER] = cartesianPosSteps[X_AXIS] + cartesianPosSteps[Z_AXIS];
corePosSteps[C_TOWER] = cartesianPosSteps[X_AXIS] - cartesianPosSteps[Z_AXIS];
corePosSteps[B_TOWER] = cartesianPosSteps[Y_AXIS];
#elif DRIVE_SYSTEM == ZX_GANTRY
//9 = y axis + xz H-gantry (x_motor = x+z, z_motor = z-x)
corePosSteps[A_TOWER] = cartesianPosSteps[X_AXIS] + cartesianPosSteps[Z_AXIS];
corePosSteps[C_TOWER] = cartesianPosSteps[Z_AXIS] - cartesianPosSteps[X_AXIS];
corePosSteps[B_TOWER] = cartesianPosSteps[Y_AXIS];
#elif DRIVE_SYSTEM == GANTRY_FAKE
corePosSteps[A_TOWER] = cartesianPosSteps[X_AXIS];
corePosSteps[B_TOWER] = cartesianPosSteps[Y_AXIS];
corePosSteps[C_TOWER] = cartesianPosSteps[Z_AXIS];
#endif
return 1;
}
#endif
For now I will try the harder solution, however I am as excited as any to see the future version of repetier and the benefits it brings. I also, hope I can count on such support in the near future, for there will be no doubt a plethora of rookie mistakes in my code along the way.
And in the time it took me to write this, I remembered also, that I don't know a way to assign 2 stepper channels to the Y axis..............
I want build printer at this kinematics.
And hope what You will add this kinematics in new version FW.
Thank You!
In configuration tool I can choose this kinematics? In future. Not now.
Mechanical parts of my printer may by ready after New Year.
Have new question.
1.04 dev - don't work X endstop.
1.03 - all OK.
How to fix it?
I'm looking for use 1.04 - LA and bedleveling more best than in 1.03.
Thanks!
Thank You!
I try use updated 1.04 version. In this kinematics X endstop so don't work.
So printer run at 1.03 version (Arduino Due, SMART RAMPS).
In the other printer (Ultimaker, MKS GEN L 8 bit) 1.04 work very fine.
Thanks!
Endstops now work properly.
Thanks!