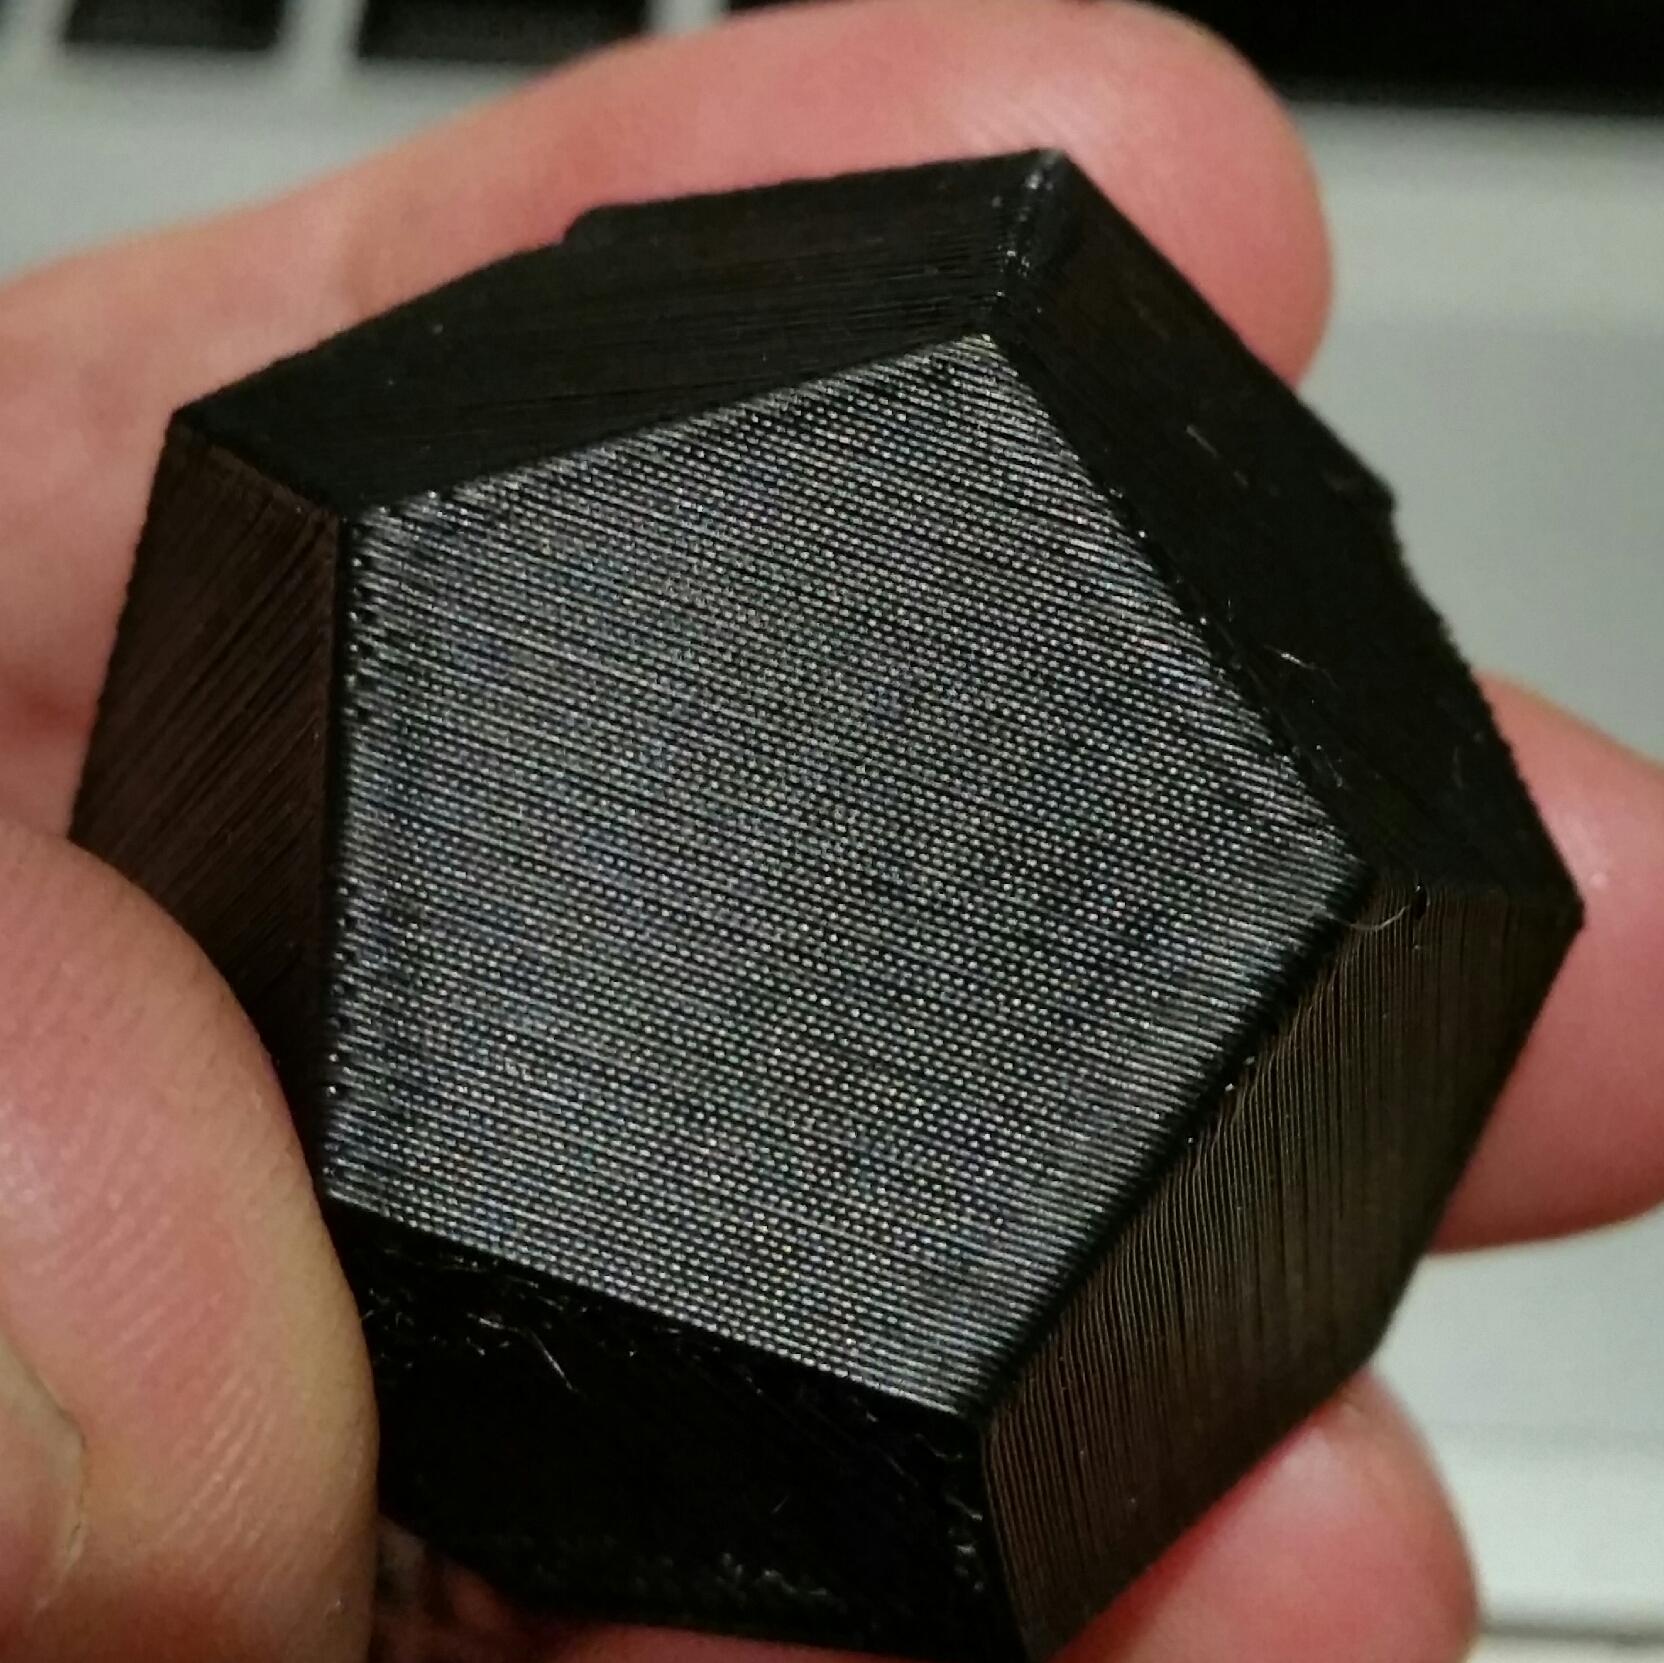
Odd vertical lines showing up

New to Repetier, but I'm familiar with other firmwares like Marlin and Sailfish.  I've recently changed the electronics on my custom core-xy bot from Rumba\DRV8825s\Marlin to RADDS\SD6128s\Repetier.
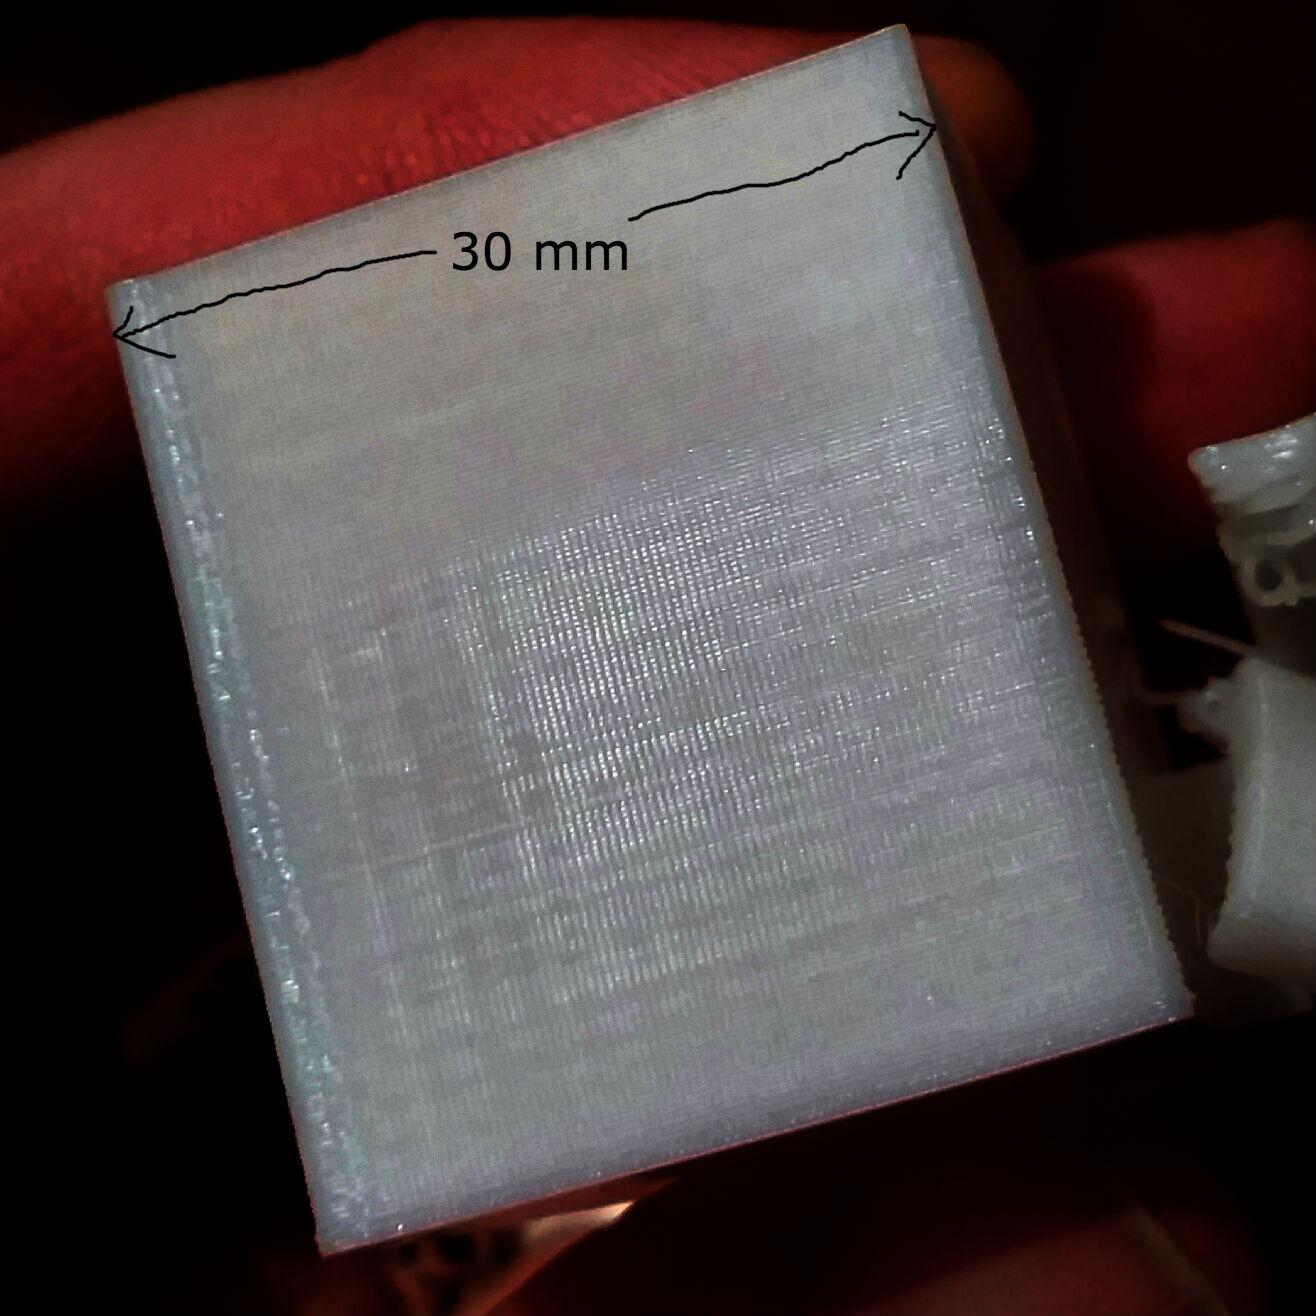
The old & new stepper drivers are both set to 1/32 microstepping.  

I'm seeing new artifacts in my prints that didn't show up with the Rumba\Marlin combo:  Tiny 'steps' in my layers, that when lined up form vertical bands.  Measuring them, there's 3 per mm.  I have two pictures showing this below.
I've done additional tests printing cubes lined up with the build platform, and rotated 45 deg on Z:  The issues only show up on the 'lined up' cubes, not the '45 deg cubes':  Which makes me think this is an issue with core-xy:  When at 45 deg, only one stepper is driving the motion, and while 'lined up with the bed', both steppers are firing to drive the head straight. 

Any thoughts as to what could be causing this?  Thanks

image

image


«1

Comments

  • did you find a solution . i am also having the same problem on my corexy with ramps and sd6128


  • Nope.  No replies here, or anywhere else I asked.  They're still showing up :(
  • Please check the fast core xy implementation of repetier, see


    15. Feb onwards you find explainations on how to use. It is a different approach to satisfy core xy that leads to faster handling and is similar to math done by marlin.
  • Thanks, I'll give that a shot.  Feedback appreciated!
  • I did a complete download\install of the latest firmware 92.9, added this line to my configuration.h:
    #define FAST_COREXYZ
    Halved my steps per mm on X&Y, and re-uploaded...

    Right now, everything is traveling twice as far as it should.  As if I shouldn't have halved my steps per mm.
    Thoughts?

  • edited May 2016
    Ok, my eeprom wasn't being updated, that's the issue with the steps per mm, got that fixed.

    Ok, reprinted with those updated settings and.... same exact lines show up.  Was worth a shot.
    Also, whenever it homes or moves the nozzle to start the print, it's really jerky.  Once the print starts it's ok.
    :(
  • my lines are worse.. kind of stuck here.. 

    i have the sd6128 running on the ramps.. i even have a4988 and drv8825.. the issue stays with all

    image
  • ekaggrat : That looks like a different problem from what I'm seeing.  My lines are super tiny and very regular.  Yours almost look like problem with the mechanics of your machine, if I could theorize about it.  The screen-left vertical edge of the R has regular waves as it goes up Z, like the leadscrews are tweaking the position of your bed or something.  Just a guess.
  • @ekaggrat I agree with AK_Eric regarding z wobble. What you also see is waves from vibration moving around corners. That is quite normal and can be reduced with good tension and not too high accelerations.

    @AK_Eric your problem looks like you see every step. Could be that the motor do not lock into substeps. Have you tried increasing resolution and current? If the current is not high enough you do not get full substeps. And since it depends on 2 motors running in sync it could be one or the other falling into near full step position.

    The jerks you see are normal and a result of not full planned paths, so it speeds down between 2 nonlinear moves. Try updates per second set to 10. You do not need so high values like for deltas as moves are not nonlinear. As you already saw it disappears once buffers are filled.

  • Background:  They're the same steppers I was using with my RUMBA board (with Marlin), with DRV8825's set to 1/32 microstepping:  
    These lines\dots never showed up in that config. The steppers are the one thing I'd expect to not be causing this.  Could be wrong though.  I used the same 1/32 microstepping on the new SD6128's to try to keep as much in parity.

    I've checked with my meter, and both steppers are getting the exact same voltage applied.  When I first did the new RADDS\SD6128\Repeteir setup, I had their voltage higher, but they'd get molten hot to the touch, so I dialed them back to a less "house-fiery" temp ;)  but I should be able to put a bit more juice back into them without fear:  I can try pushing that up a little though an seeing if the behavior changes. 
    Appreciate the troubleshooting!
  • Changed the ref voltage from .58 a piece up to .75v:  Printed again, exact same results.
  • From raps128 docs:
    Recommended voltage range: 0.8 to 1.6 V. This corresponds to a theoretical peak engine power from 0.73 to 1.46 A - See more at: http://doku.radds.org/dokumentation/raps128/#sthash.wp0ep6W0.dpuf

    Voltages are not the same as for DRV8825. 1.6V is for 2.2A motors. So you are running on the weak side. They get quite hot easily. I put a fan on the coolers to keep them cool. 
  • When I first got them I'd set them to .9v:  This caused them to nearly turn to molten slag.  But like you said maybe they need to be cooled down in the process.  I'll try some more tests, thanks.
  • So I tried two more tests:  .9v, and just over 1.0v (while holding two fans blowing directly at them) :  In both instances, the behavior did not change: Exact same lines\dots popping up in no greater or lesser quantities.  The issue thus appears to be independent to the voltage going to the steppers.
  • Your pattern looks bigge rthen only a substep and even if firmware would lag one substep I doublt it would look like this. And the RAPS128 are normally known to be better. Anyway have you tried with DRV8825 on RADDS? Just set STEPPER_HIGH_DELAY and double step delay 1 for these or you will loose steps. 
  • Sounds like a good next step:  To do that, I'll have to completely unwire my board to remove it from the case since all the dip switches I'd need to update to support this are on the back side of the board.  Sigh, wish they would have put them under the drivers a-la the Rumba instead of a completely inaccessible place.

    Not something I want to tackle right now, but if I ever get around to it I'll post my findings.
  • Aren't 1/32 steps the same switch setting?
  • edited May 2016
    Unfortunately not.  For 1/32 microsteps:
    The SD1628 the dips are on,off,on.
    The DRV8825's, it's on,on,on
    So I have to basically take everything apart to access that.  Not impossible, but not something I want to deal with right now.
    While the flaws bug me, they are really small and hard to notice.
  • To follow up:  I installed RepRap Firmware on my bot:  Same exact lines are showing up with that firmware.... so this isn't a firmware issue.  At this point, I'm leaning towards it being something with the RADDS board itself, or the SD6128 stepper drivers.  Next test will be to change from 1/32 microstepping to 1/16th, and see if that fixes anything.
  • Good to hear it is not the firmware - at least for me. Thanks for the update.
  • On a side note, I switched to 1/16 microstepping, they still show up.  Bah!
  • Could that be related to decay settings the RAPS128 have (second poti)?
  • edited June 2016
    I have the SD6128:  It only has one pot.  Maybe there is some way to configure that through firmware?  I'll have to look into it, thx.
  • Hello,

    I had the same issue with my RADDS and DRV8825s.  The mechanicals are the PowerSpec Ultra3D - everything worked fine with the FlashForge driving it.  But, with RADDS+DRV8825, I had the vertical ripples.

    On my X,Y,X I had 1/32 micro stepping but, on the extruders, I decided to go with 1/16.  I wasn't getting satisfactory prints at all - thin extrusions, etc.  So, I rebuilt the hotend and that improved things somewhat and that's where I started seeing the problem.

    I decided that maybe 1/16 was the problem, so I shut everything down and decided to adjust the microswitches to 1/2 or no micro stepping.  But, in reviewing what I had originally set the switches to, I found the problem: Instead of MS1 = 0, MS2 = 0, MS3 =1, I had MS1 = 0, MS2 = 1, MS3 = 1, which is undefined for DRV8825.  I think, too, one of the switches wasn't fully engaged off or on.

    Once I reset for 1/16 (checking to make sure all the DIPs were either on or off) and adjusted the voltage (I thought it was <1V or very near to it, otherwise the stepper would get loud), my test block started coming out smoothly.


  • edited November 2016
    Hi all,

    I was posting similar issue in another thread but seems here more are reporting the same.
    I have tested so far all that I could think off.

    Controller (tried my old RAMPS1.4 with Allegro drivers 1/16 running Repetier as well), swapped the extruder stepper, extruder MK.
    Checked and adjusted all belts, idlers, ... (despite I don't think the problem is mechanical)
    Still no luck.

    image

    The marks are quite consistent across different prints.
    image

    Adjusting the drivers voltage and decay seems to have smoothed it up a bit.
    image

    But if I increase speed it gets worse.
    All tests are done using the same gcode that prints at 60mm/s that is not too high of a speed.

    As I'm running out of options, next steps I can only think of power supply?
  • Do you have infill disabled? YOu could get something like that also from infill with thin walls.

    As a test print with 0% infill and 20mm/s. The slow speed is to reduce vibraion to minimum and to show the error more prominent. If it comes from motor control it should be more prominent.
  • Nandox7 said:
    Hi all,

    I was posting similar issue in another thread but seems here more are reporting the same.
    I have tested so far all that I could think off.

    Controller (tried my old RAMPS1.4 with Allegro drivers 1/16 running Repetier as well), swapped the extruder stepper,
    But if I increase speed it gets worse.
    All tests are done using the same gcode that prints at 60mm/s that is not too high of a speed.

    As I'm running out of options, next steps I can only think of power supply?

    I had this exact issue and I would have sworn these prints were off my printer. I tried everything I could think of. Changing one thing at a time, I virtually rebuilt the printer, including the controller and using different types of stepper drivers, new belts, new extruders, c/w motors. It almost went in the skip!

    I tried a 16T and 20T pulley and noticed that the ridges equalled the steps of the motors, so different on x and y. Therefore, I bought some 0.9 degree motors and changed out x, y and e all at the same time. The problem went away!!

    Trying to discover the cause of the issue, i put one of the old motors on E and the problem came back. I put the 0.9 motor back on and the problem was still there.

    So, what I've worked out through more experimentation, is that both my X and E motors were interfering with each other. Every time I swapped them one at a time, the bad unchanged motor was faulty and affecting the new motor, making that faulty too. And the cycle repeated itself, as I was changing the motors one at a time!


  • edited March 2017

    Not a corexy issue or specific to any type of printer.  they'll all do it, except maybe a delta... though i don't know but i saw it on every other type regardless in one form or another.  


    This seems far from determined,  in some cases it's low current (slower speed) micro stepping to EMF of some sort.    For me i started noticing them because i looked.  after looking at older prints, it's present although maybe less obvious.  if you run your finder/nails across a print surface you can still feel they are there... or they make the zig sound  for example even if you cannot see them.    All printers have it far as i know... i also know it's more obvious in black and PLA makes these type of artifacts worse... with ABS the surface is so nice.    

    it could just be skipped steps where it snaps into full stepping which is worse in low current (slower speeds).  if it happens at high speed, increase current.     there is a case where another guy on a forum added another X axis motor (cartesian i think) so dual X, and it disappeared and surface finish was much better.   


     I have tried so far the usual alegro drivers, DRV8825s, TMC2100s at 256 microstepping and 1.8deg and 0.9degree motors.    Its always present unless i go a little quicker... i also tried 12V and 24V power.  same.    However with 0.9deg steppers they get closer together....  but what's more odd is i have the same motors and drivers and One axis is worse than the other....  which means it could be entirely electrical....  or both really.   however one thing that's remained consistent is speeding up removes them...or at least makes them less visible.  plus using ABS on top of that makes for nice finishes. 


    Edit:  this is on a radds/due and regular Ramps.  never tested on anything else.  

  • Hi, I've got exactly de same problem.
    https://img11.hostingpics.net/pics/911265DSC00685.jpg
    Someone of you have found a solution since this last post?
    Except this problem my printer works very well, but all my print is ugly only because this. it makes me crazy...

  • No, not the same problem. This might be from infill pattern (does it match the infill density?) or vibrations from belts or direction changes or ... transfered.
Sign In or Register to comment.